Context
Purpose
In this tutorial we will show how you can create a STAC Item catalog that contains all the necessary information about your datasets.
Description
This is the first of a two-part tutorial on how to upload your data to EarthCODE. In this part we will create a new Catalog using PySTAC. This Catalog should be self-contained and should not be uploaded directly to the Open Science Catalog (OSC). Instead, it should be uploaded to some persistent storage. In this example we will upload it to an open-access repository on GitHub. In the next tutorial when we will create an OSC entry, we will simply add a reference to our Item-Catalog as a “remote-child”.
STAC Items
A STAC Item is the lowest level component of a STAC catalog. All STAC Items must have an associated data Asset, in addition to the Asset (which you can think of as a data file), the Item also contains metadata about the data itself, such as:
- Spatiotemporal extent
- Data collection (e.g. Sentinel or Landsat)
- Bands
- Cloud Cover
Prerequisites
In this example we assume that the data files are already uploaded to a remote storage, and we have a txt file with the download URLs, but feel free to modify this example for your own data files!
In this example we will be using this supraglacial lakes dataset: https://txt file with the following content:
# ./tif_links.txt
https://zenodo.org/records/7568049/files/extent_S1B_EW_GRDH_1SDH_20171111T205337_20171111T205438_008239_00E91A_F8D1.tif
https://zenodo.org/records/7568049/files/extent_S1B_EW_GRDH_1SDH_20190224T203744_20190224T203844_015093_01C356_B9C1.tif
https://zenodo.org/records/7568049/files/extent_S1B_EW_GRDH_1SDH_20170620T205332_20170620T205433_006139_00AC89_6857.tif
https://zenodo.org/records/7568049/files/extent_S1B_EW_GRDH_1SDH_20180923T202118_20180923T202218_012847_017B82_7DD5.tif
https://zenodo.org/records/7568049/files/extent_S1B_EW_GRDH_1SDH_20181108T203747_20181108T203847_013518_01903B_D463.tif
Loading Libraries
import json
import time
import requests

import pystac
import rasterio
from pathlib import Path
Creating the Item Catalog
Our items need to be contained in its own STAC Catalog. This catalog should also include some general information about our dataset.
title = "Item Catalog Example"
description = "A collection of supraglacial lakes data in a very useful example notebook."
catalog_id = "supraglacial-lakes-example-2025"

catalog = pystac.Catalog(
    id=catalog_id,
    title=title,
    description=description,
)catalogThat’s all! Most of the metadata will be added to the Items which we will add to this catalog shortly.
Creating a single STAC Item
Manually creating STAC Items can be cumbersome and is prone to errors (but possible!). Luckily there are many tools that can make the process a lot easier.
Here we will use rio_stac (documentation here) which is a library that we can use to open and extract metadata from raster datasets.
filenames = []

with open("tif_links.txt", "r") as f:
    for line in f.readlines():
        filename = line.strip()
        if Path(filename).suffix == ".tif":
            filenames.append(filename)

print(f"Number of files found: {len(filenames)}")
print(f"Example link: {filenames[0]}")
Number of files found: 5
Example link: https://zenodo.org/records/7568049/files/extent_S1B_EW_GRDH_1SDH_20170620T205332_20170620T205433_006139_00AC89_6857.tif
from rio_stac import create_stac_itemitem = create_stac_item(
source=filenames[0],
id="item_1",
asset_name="data", # EarthCODE standard asset name
with_eo=True, # all the metadata!
with_proj=True,
with_raster=True,
)Inspecting the result we can see that this function has extracted rich information about our raster file. This information is attached to the Item. This Item also has an "assets" attribute which references the actual data.
itemCreating the rest of our Items
Now that we have shown how to generate a single Item using rio_stac, we can repeat the process for the rest of our data files. The goal is to create a list of STAC Items, that we can add to our Catalog with the buit-in Catalog.add_items() method.
We could in principle just iterate over the method above, but in order to respect the rate limits for our data provider (Zenodo), we define a function which reads the response headers and responds appropriately.
This function also saves the file to a local temporary destination instead of reading the data from Zenodo directly.
import time
import requests

def download_zenodo_file(url: str, local_path: str, max_retries: int = 5) -> None:
    """
    Download a file from Zenodo into local_path, respecting rate limits if we hit 429 responses.

    :param url: The direct download URL from Zenodo.
    :param local_path: Where to save the file locally.
    :param max_retries: Number of times to retry the download if repeatedly rate-limited.
    """
    attempt = 0

    while attempt < max_retries:
        response = requests.get(url, stream=True)

        if response.status_code == 200:
            with open(local_path, 'wb') as f:
                for chunk in response.iter_content(chunk_size=8192):
                    f.write(chunk)
            return

        # If rate-limited (HTTP 429), then check rate-limit headers and wait.
        elif response.status_code == 429:
            attempt += 1
            if reset_timestamp := response.headers.get("X-RateLimit-Reset") is not None:
                now = time.time()
                wait_seconds = int(reset_timestamp) - int(now)
                wait_seconds = max(wait_seconds, 1)  # Wait at least 1 second.
                print(f"Got 429 Too Many Requests. Waiting ~{wait_seconds} seconds.")
                time.sleep(wait_seconds)
        else:
            response.raise_for_status()

    raise RuntimeError(f"Failed to download {url} after {max_retries} retries.")
Now we can iterate over the rest of our data files and create the STAC items.
import rasterio

items = []
local_tmp_file = "tmp.tif"

for idx, remote_url in enumerate(filenames[0:]):
    # Save our dataset to the temporary file
    download_zenodo_file(remote_url, local_tmp_file)

    # Inspect the local file and create a STAC Item
    item = create_stac_item(
        source=local_tmp_file,
        id=f"item_{idx+1}",
        asset_name="data",
        asset_href=remote_url,  # Explicitly set the asset reference to the remote one!
        with_eo=True,
        with_proj=True,
        with_raster=True,
    )

    items.append(item)
# Verify that our items all point to the correct reference
for item in items:
print(item.assets['data'].href)https://zenodo.org/records/7568049/files/extent_S1B_EW_GRDH_1SDH_20170620T205332_20170620T205433_006139_00AC89_6857.tif
https://zenodo.org/records/7568049/files/extent_S1B_EW_GRDH_1SDH_20180923T202118_20180923T202218_012847_017B82_7DD5.tif
https://zenodo.org/records/7568049/files/extent_S1B_EW_GRDH_1SDH_20181108T203747_20181108T203847_013518_01903B_D463.tif
https://zenodo.org/records/7568049/files/extent_S1B_EW_GRDH_1SDH_20190308T203744_20190308T203844_015268_01C91A_BB81.tif
https://zenodo.org/records/7568049/files/extent_S1B_EW_GRDH_1SDH_20181122T202118_20181122T202218_013722_0196AA_675B.tif
Looks good!
Adding Items to our Item Catalog
Now that we have defined our items, we can add them to our catalog.
catalog.add_items(items)[<Link rel=item target=<Item id=item_1>>,
<Link rel=item target=<Item id=item_2>>,
<Link rel=item target=<Item id=item_3>>,
<Link rel=item target=<Item id=item_4>>,
<Link rel=item target=<Item id=item_5>>]catalogSaving the Catalog
If we inspect the Catalog, we can see that it now contains Links to the Items, but the links themselves don’t contain any references.
With PySTAC, the real magic happens when you normalize and save the Catalog. This is when all the links are resolved, and a folder structure will be laid out following best practices, automatically!
What we will do is to specify a target location, which will become the root folder of our Catalog. When we normalize the Catalog to this folder, all the internal references will be resolved with relative paths. When we save the Catalog, PySTAC will generate the JSON files in the folder we just normalized to.
We normalize and save the Catalog as “self contained”. Here is the description of a self-contained catalog from the PySTAC API documentation:
“A ‘self-contained catalog’ is one that is designed for portability. Users may want to download an online catalog from and be able to use it on their local computer, so all links need to be relative.”
In other words, exactly what we want to make our data accessible!
output_folder = "supraglacial-lakes-item-catalog"catalog.normalize_and_save(root_href=output_folder, catalog_type=pystac.CatalogType.SELF_CONTAINED)If you inspect the Catalog you can see that PySTAC has added a few more links to our Catalog, namely to the root catalog and itself, which in this istance is the same.
Also notice that the Link.href attributes show absolute paths in the notebook. However, you should now have the actual STAC catalog saved in the output_folder.
The folder will have the following structure:
supraglacial-lakes-item-catalog
├── catalog.json
├── item_1
│   └── item_1.json
├── item_2
│   └── item_2.json
├── item_3
│   └── item_3.json
├── item_4
│   └── item_4.json
└── item_5
    └── item_5.json
Looking at the catalog.json:
{
  "type": "Catalog",
  "id": "supraglacial-lakes-example-2025",
  "stac_version": "1.1.0",
  "description": "A collection of supraglacial lakes data in a very useful example notebook.",
  "links": [
    {
      "rel": "root",
      "href": "./catalog.json",
      "type": "application/json",
      "title": "Item Catalog Example"
    },
    {
      "rel": "item",
      "href": "./item_1/item_1.json",
      "type": "application/geo+json"
    },
    {
      "rel": "item",
      "href": "./item_2/item_2.json",
      "type": "application/geo+json"
    },
    {
      "rel": "item",
      "href": "./item_3/item_3.json",
      "type": "application/geo+json"
    },
    {
      "rel": "item",
      "href": "./item_4/item_4.json",
      "type": "application/geo+json"
    },
    {
      "rel": "item",
      "href": "./item_5/item_5.json",
      "type": "application/geo+json"
    }
  ],
  "title": "Item Catalog Example"
}
we can verify that everything looks correct.
The item JSON files should have the following links:
  "links": [
    {
      "rel": "root",
      "href": "../catalog.json",
      "type": "application/json",
      "title": "Item Catalog Example"
    },
    {
      "rel": "parent",
      "href": "../catalog.json",
      "type": "application/json",
      "title": "Item Catalog Example"
    }
  ],
... among all the other metadata we have added.
Upload the Item Catalog
In this part we will upload the Catalog in order to make it available. Feel free to do this in any way you like as long as you are sure the files will remain accessible!
A good option is to upload the files we just created to GitHub. In the next part of the tutorial, when we will create an entry to the Open Science Catalog, we will only need the URL for the catalog.json we have in our root. The STAC browser will read the files directly from this repository and extract all the information from our Items automatically.
We will now show how this can be done with GitHub and the git CLI.
Create a public GitHub repository
Go to github.com/new and create a remote repository. Here we will name it the same as our local folder, make sure it is set to public, and ignore everything else.
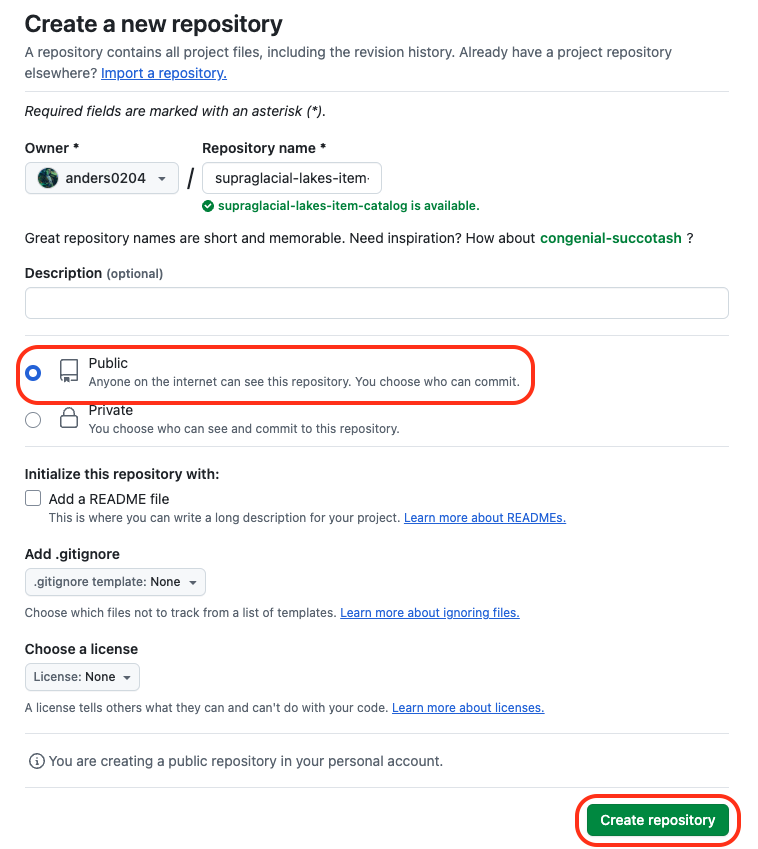
GitHub create a new repository
After creating the repository, you can simply click upload existing files to upload your files manually, or if you are comfortable with git, do it through the command line interface:
# Navigate to the Item Catalog we want to upload
cd supraglacial-lakes-item-catalog

# Initialise it as a git repository
git init

# Add the URL to your newly created GitHub repository as the remote version of your local files
git remote add origin https://github.com/<username>/supraglacial-lakes-item-catalog.git

# Add and commit your files
git add --all
git commit -m "Useful commit message"

# Set the remote main as the upstream version of your local main, and push your changes
git push --set-upstream origin main
When you refresh GitHub page, you should see your STAC catalog.
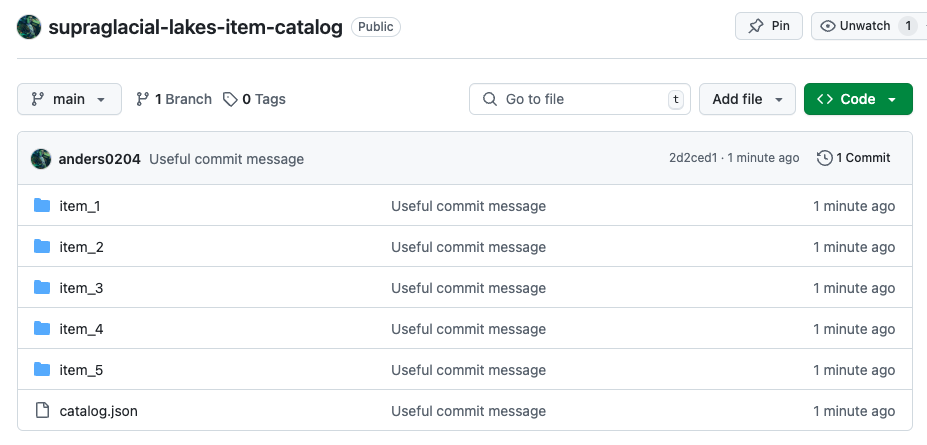
New GitHub repository
That’s it!
In the next stages we will explain how to create and add your product to the Open Science Catalog, linking to the Items we just created.